How to Make Polar Bear Cookie Pops
November 29, 2012 by ThePartyAnimal
Filed under Cookies
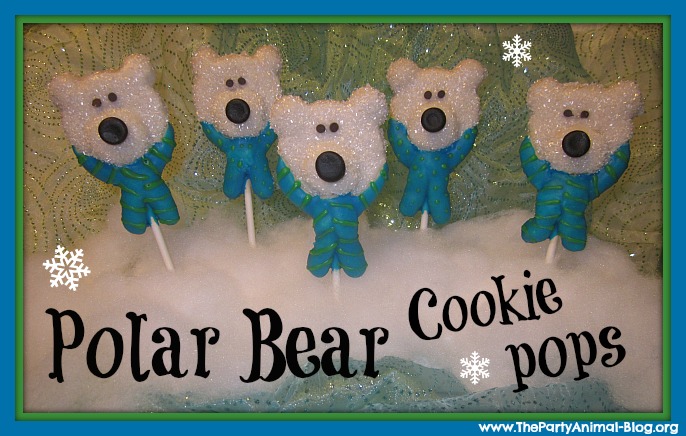
 If you are looking for a cute treat idea for your Winter, Holiday or Classroom Parties then this is one to consider. These Polar Bear Cookie Pops are unique, sparkly, fun and scream winter time.
Last week I sketched up a bunch of new treat ideas to make this holiday season and these Polar Bear Cookies were top on my list. I love Polar Bears and they are perfect for winter time, don’t ya think?
Best part as always is they are super EASY to make, taste yummy and the kids will love them. Of course I am going to show you how to make them step by step as I did for the very first time.
How cute would these be for a Polar Bear Party Theme? Check out my main website for some Stuff a Plush Polar Bears that would be a perfect addition to the festivities.
Here is the Sugar Cookie Recipe I used for my Polar Bear Cookies:
- 3/4 Butter (softened)
- 1/2 Cup Sugar
- 1 1/2 Cups Flour
- 2 tsp Vanilla
This recipe made 6 Cookie Pops – need more then just double it!!!
Mix together your Butter and Sugar, add in Vanilla and then slowly mix in your Flour. It will get crumbly. Then mix the rest of the way with your hands to form your cookie dough. It is that simple.
Other items used for the Cookies:
- Confectioners Sugar
- Milk
- White Sugar Crystals
- Mini Chocolate Chips (eyes)
- Black Gum Drops (nose)
- Blue & Green Food Coloring Gel
- Cookie (Lollipop) Sticks
- Toothpicks
Now lets make some Polar Bear Cookies….
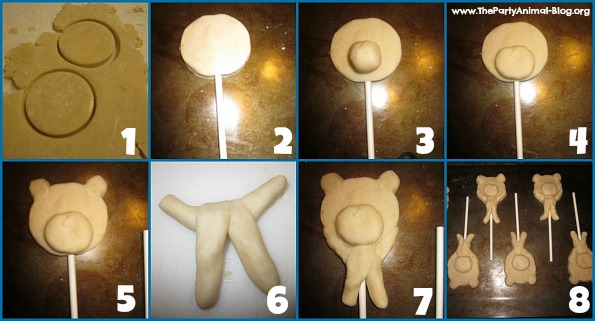
1. So what I did was roll out my dough and cut out some round cookies about 2″ in size. Honestly I just used the bottom of a cup as my cookie cutter, shhhh.
2. I stuck in my Cookie Stick
3. Next I took a small ball and added it on my cookie for the bears nose area.
4. Then I flattened that out.
5. Then I took 2 small balls and gave him ears.
6. I then created a scarf for my Polar Bear by making a snake of dough and then 2 more and attached it as shown in the photo.
7. Next I attached the scarf to my Polar Bear Head.
8. Off to the oven the went to bake on 350 for about 12-14 minutes.
Tip: When attaching the Ears, Nose area and Scarf I used some water where I was attaching it just to insure it stuck on well.
Time to decorate:
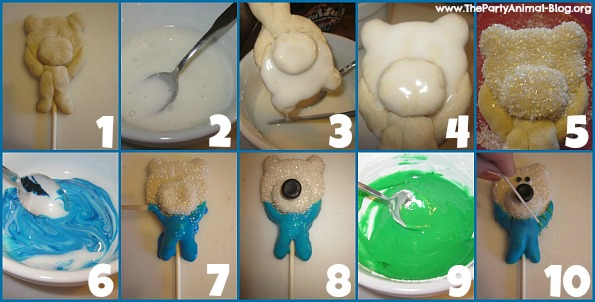
1. Grab your cooled cookies.
2. Mix up some icing using about 1/2 Cup Confectioners Sugar and 2 Tbsp Milk – You can add vanilla in, but I do not because it is sweet enough and I am just fine with that flavor.
3. Use the icing and cover the Polar Bears Face only – you can see how I held it in the photo.
4. Iced Face – yummy!!!.
5. Sprinkle and cover the Polar Bear’s face with the white sugar crystals – let that set before moving to the scarf.
6. Now create some Blue Icing for the scarf.
7. Ice your scarf Blue – I used a Toothpick to do this – I am not fancy with tools – lol
8. Using left over white icing put a dab on the back of your Black Gumdrop flat side up and stick it on – do the same with the Mini Chocolate Chip Eyes.
9. Next make a small batch of Green Icing or just color the leftover White into Green.
10. Using a toothpick create stripes or polka dots onto your scarf.
That is it!!! Easy right?
You can do your Scarves any color you like, but I love those two colors together and I think they looked great. You can also not even put the scarf on at all and tie a ribbon below the head only to make it even easier. If you are taking them somewhere like to school for the kids create just the head and put them in treat bags with a fun winter ribbon. So many options.
What I think makes these Polar Bear Cookies is the Sparkly White Sugar Crystal coating.
Come on how cute are they all set up in a wintery scene?
